In the beginning was screenprinting

"One of the strengths of the screen printing process is its ability to print on any material, of any size, of any thickness, in any colour and any quantity," wrote J. I. Biegeleisen in his volume The Complete Book of Silk Screen Printing Production. This is why silk-screen printing is the technique that allowed the very birth of promotional objects, later replaced, according to requirements, by pad printing and today flanked by digital printing. Here, we tell you its history and its evolution.
By Lorenzo Capitani | On PRINTlovers 104
It was 1938 when the book Technical Problems of the Artist: Technique of the Silk Screen Process by Anthony Velonis, an American artist and designer, was published in New York. Velonis was a key figure in the history of silk-screen printing: he transformed it from a craft technique to an art form to the industrial printing technique as we know it. Anthony was a big guy of Greek descent who, since 1932, had been working for the WPA - the Works Progress Administration - one of the major American agencies known, among other things, because during the New Deal, it had given jobs to millions of people and helped pull the country out of the Great Depression. Velonis had the intuition to suggest that the WPA use screen printing, which was little known then, to print billboards, increasing productivity.
The WPA at the time had a specific support programme for the visual arts - the Federal Art Project - which involved more than 10,000 artists and artisans throughout the United States. The technique was very popular and was adopted on a large scale: it was cheap, easy and allowed the artist to use 16 to 20 colours in a print (as in Velonis' work 6:30 p.m.), whereas colour lithography was much more limited. Velonis also wrote a 40-page manual on silk-screen printing, which was so popular that it circulated in mimeographs. However, we have to wait until 1937 to find the term "Serigraphy" for the first time, coined by Carl Zigrosser, author of Six Centuries of Prints (1937): until then, "screen printing" or "silk screen" had been used.
Andy's assembly line
The sharp silhouettes, solid colours and incisive messages obtained with this new technique were perfect for the posters that plastered the American metropolises, and the ease of processing was ideal for industrialising the process. And it was precisely the simplicity and industrial replicability of silk-screen printing that Andy Warhol sought. "In August of '62," he declared in an interview, "I started to do screen printing. The rubber stamp method I had used to replicate images suddenly seemed too homely; I wanted something stronger, something that gave a more precise assembly-line effect. [...] You get the same image, each time with some slight difference. It was all so simple, so quick, so random." Warhol had trained as an advertising graphic artist and, up to that point, had used the technique of "blotted line" to mass reproduce his works, which consists of going over the outlines of a drawing with very liquid ink and then imprinting it on a sheet of blotting paper to obtain a copy; or he would cut out a very soft rubber to get a sort of mould to reproduce simple, linear images or drawings. The discovery of silk-screen printing changed his life and the history of art.
A collective invention
Despite these two artists, the invention of screen printing, like so many times in human history, cannot be associated with some legendary figure like Gutenberg or Senefelder. A precise date marks Gutenberg's historic discovery of movable type: 1450. And Senefelder is said to have accidentally discovered lithography by writing a laundry note on a grease-covered stone in 1796. On the other hand, Serigraphy has no "birth certificate"; it is the classic collective innovation, as the American palaeontologist and essayist Stephen Jay Gould understands it, which developed spontaneously and independently in different places.
It all seems to have originated with stencils. Some say that the Phoenicians and Egyptians had already used them to decorate fabrics and walls. But the closest technique to our screen printing is probably that of the ancient Japanese, who used stencils of rather thick oiled paper through which openings were cut out and, to prevent the isolated parts of the cut-out paper from falling out, a dense net of hair, later replaced by silk. Thereafter, however, screen printing appeared and disappeared through the centuries without ever really catching on until France in the mid-18th century, when Jean Papillon the Younger began to produce wallpaper using the method known as "pochoir". Compared to today's screen printing, there was no frame, which made its first official appearance in the 1907 patent of Englishman Samuel Simon as a support for the stencil. Simon's technique, however, still lacked a squeegee to spread the colour, which was replaced by a simple brush.
How a screen print is made
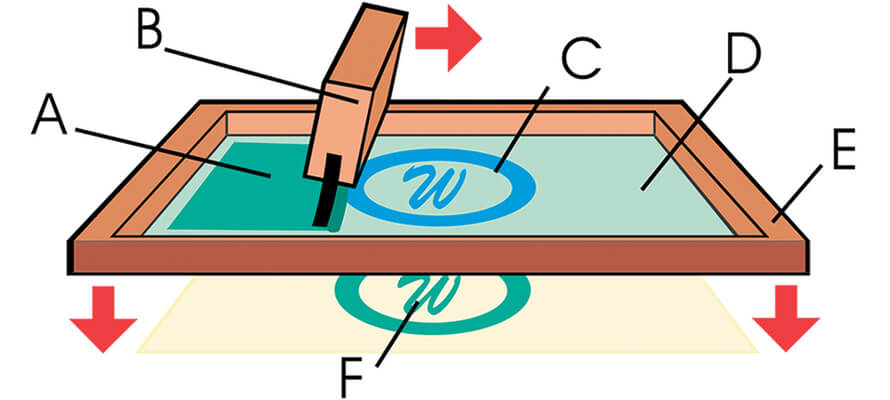
Screen printing today is a direct permeographic printing process that consists of two steps: the photo printing of the screen printing frame to create the graphics to be printed and the actual printing. It starts by preparing a frame consisting of a rigid frame (E) and a uniformly stretched fine mesh, which is covered with a photosensitive emulsion (D). A transparent photographic film with the design to be printed is superimposed on it (C). The frame prepared like this is exposed to a source of ultraviolet light at 365 nm, which causes the emulsion to harden only in the areas exposed to light, while the areas covered by the design remain soluble. The design acts as a mask: the dark areas of the graphic prevent light from passing through, while the transparent areas allow exposure. Washing the frame with a jet of water under pressure dissolves the uncured emulsion, leaving the transparent outline of the graphic which the ink will pass through.
The frame prepared like this is ready for printing. It is mounted on a screen printing table that ensures proper stability and even pressure during printing, while the substrate to be printed is placed under the frame. Screen printing ink is poured into the upper part of the frame (A), and with a spatula called a squeegee (B), the ink is pushed through the mesh of the frame, exerting uniform pressure. Only emulsion-free areas of the design allow the ink to pass through, depositing it on the underlying surface and creating the desired image (F). Once the print is complete, the frame is lifted to separate it from the printed surface, which is allowed to dry and copy after copy. At the end of the print run, the frame can be kept for future use or washed from the emulsion to be imprinted again.
A matter of threads
The key to the whole process is the frame, or rather its thread count, which depends on several factors, each of which affects the final quality of the print: the type of substrate on which it is printed, the type of ink used, the type of detail in the design and the desired thickness of the print. The screen printing frame consists of a mesh of polyester or nylon threads stretched over a frame, and the density of the mesh is expressed in threads per inch (mesh count). The number of threads (e.g. 110, 230, 305 mesh) is a parameter that must be chosen according to the job's specific requirements. Thicker or opaque inks generally require low mesh (60-110 mesh), as their thicker consistency needs a larger mesh to allow for adequate coverage and easy ink deposition. Conversely, thin or transparent inks (such as water-based or UV inks) require higher mesh sizes (150-305 mesh), as they allow for greater precision in detail reproduction and less ink transferred, preserving sharpness of detail. The number of threads in the frame directly affects the quality of details: the higher the mesh density, the finer and more detailed the print will be. However, increasing the number of threads can also result in greater difficulty in ink transfer, especially with more viscous inks or when high thicknesses are desired. Also, if you use a mesh with a very high thread count, the ink will struggle to pass through, and the print will be lighter and less opaque. In this case, more passes are needed. The weave, i.e. the orientation and shape of the weft, can also greatly influence the sharpness and precision of the final image: the finer and smoother it is, the better the image definition will be.
Beyond the technicalities of the characteristics of the frames, the technique itself would be straightforward, so much so that on YouTube, hundreds of videos explain how to screen print even at home and on Amazon, there are DIY kits for a few euros. Yet, since Simon's patent, it has taken many years for screen printing to turn into the industrial process we know as sustainable and qualitatively acceptable. As long as it was a matter of screen printing billboards, vehicles, flags, banners or shop signs, as during the First World War and later 1920s, uneven edges or smudges were acceptable. The real problem was that almost all the paints used then were self-made by mixing pigments and lithographic oils, and they took hours to dry. The breakthrough came in 1929 when Joe Ulano invented an easier-to-cut photosensitive film that adhered more easily to screen printing frames. It was the turning point. Paint manufacturers sniffed a new business and entered this new market, turning a crude craft into an industry.
The 5 'any's
Where the success of screen printing lies is well explained by J. I. Biegeleisen in his The Complete Book of Silk Screen Printing Production: "One of the strengths of the screen printing process is its ability to print on any material, of any size, of any thickness, with any colour and in any quantity." We should add "almost", but there is no doubt that screen printing is the only technology that allows us to choose what thickness of ink we want to obtain, which is why it is also the most widely used in industrial decoration. It is also the only one that allows us to use a huge variety of inks to achieve an infinite range of effects. And it is the only one that allows printing on a long list of substrates, from textiles to paper, from wood to metals, from glass to plastic to ceramics, raw or suitably treated. Paradoxically, screen printing on paper, with which, as insiders, we are certainly more familiar, is the least used compared to other screen printing techniques, first and foremost, textile screen printing. Then there are industrial sectors that cannot do without screen printing: the automotive industry is one example, for which it is still irreplaceable today. Only screen printing can ensure resistance to chemicals, abrasion, external agents and light of lettering or pictograms on plastics and metals. But the semiconductor industry also extensively uses them for PCBs (printed circuit boards). Not only is information on the silicon boards - such as connector names, resistors, capacitor values, polarity of parts, and test point positions - screen printed with non-conductive epoxy inks, but the actual circuits can also be made, obviously with conductive, insulated or resistant inks.
Substrates and inks of all types
This wide range of materials and applications is essentially due to the possibility of screen printing substrates with much greater thicknesses than any other printing technique, or even finished objects, and above all, without any pressure: the frame rests on the substrate, it is the squeegee that pushes the ink over the mesh imprinting the design, the critical thing being that the surface of the printing substrate is parallel to the frame. Bottles and cans can be screen-printed with the right frames and rotating cylinders, which are suitable for printing on curved surfaces. Concave objects, however, not convex or with irregular shapes or raised edges: for non-planar surfaces, the best solution remains direct digital printing, screen printing or the more traditional pad printing. Glass, porcelain and ceramics can also be screen-printed, not only with traditional inks, but also by using a vitreous powder as ink which, mixed with a vehicle, takes on a pasty 'squeegable' consistency and, fired in an oven at 600-650 °C, becomes one with the substrate.
Special effects
The real strength of screen printing is the multitude of effects that can be achieved thanks to the right combination of frame thread count, ink type and drying technology. Only with screen printing - alone or in combination with all other printing and finishing techniques - can you achieve the wide range of special effects brought about by the availability of specific ink ranges. These include glossy, matt, satin, relief effects, glitter, metallised, iridescent, luminescent, retro-reflective, soft-touch, light-transparent but glow-in-the-dark, thermochromic that changes colour with temperature changes, photochromic that reacts to sunlight. They can range from screen printing, which, in terms of opacity and finish, gives a higher degree of gloss or colour fastness than offset printing, to the classic glossy varnish in register on a matt plastic coating, to provide emphasis and prominence to a graphic element, to significant 3D effects with thicknesses of up to 800 microns. Among the most interesting tactile effects, in addition to the soft-touch mentioned above, or peach effect, are the skin, or orange peel, effect, very similar to drip-off; the Durex, which is a rough-to-the-touch, slightly mattifying screen-printed varnish with varying degrees of roughness; the blackboard effect, which is similar in feel to slate and on which it is possible to write with chalk; the scratch-off, which is obtained with scratchable ink; and the stone effect, which can reproduce the tactile sensation of rough and coarse materials such as stone, cement or certain wood grains on the print.
Screen printing is also a valid alternative to other processes. This is the case with thickened screen printing, which can be used instead of embossing to achieve a pleasant 3D effect over offset prints with the advantage of not having the mark of the paper being smashed. Particularly suitable with thickened printing is the creation of Braille sections to be printed on cases, boxes and packaging in general.
Digital screen printing
As with offset printing, varnishing, hot stamping and die-cutting, screen printing also has its digital version. This hybrid technique combines the principle of traditional screen printing with the advanced capabilities of digital printers. Instead of using manually applied frames and inks, in digital screen printing, the image is processed and transferred directly from the file to the surface to be printed by inkjet printheads that deposit ink on a wide range of substrates or by integrating UV technologies to cure the inks instantly. There is no need to create a frame for each colour or image, which reduces setup time and costs, making the method suitable for customised or short-run production. Additionally, digital screen printing, says Boris Boscarol, owner of rtm.agency, "allows for colour gradations, shading or complex photographic images; it is possible to create halftone designs thanks to the precision of printhead control. Unlike traditional screen printing, where the screens depend on the mesh size of the frame, in the digital version, the screen is created directly by the software, allowing precise control and consistent results. This is particularly useful for photographic images or designs with complex tonal gradations like those I produce for the creative people who come to us".
Digital is progressively hybridising this technique to such an extent that the difference between printing and digital screen printing is becoming increasingly complex to grasp. Apart from the frame, the two technologies are entirely overlapping, or rather more and more machines allow printing and finishing typical of both, even inline and on a single copy. Paradoxically, it is precisely the opposite of the serialisation that Warhol sought.
Pad printing
Pad printing, which originated in the early 1900s for the Swiss watchmaking industry to print dials, is an indirect printing technique complementary to traditional and digital screen printing. It has its own specificities. It is based on using an elastic silicone pad that transfers an image from an engraved matrix (cliché) to a surface that can be curved, irregular, or three-dimensional. This makes it ideal for finished objects such as pens, caps, electronic components, promotional items, and many other materials with non-planar shapes.
Compared to screen printing, pad printing is distinguished by its ability to adapt to hard-to-reach surfaces or complex geometries, where applying a screen printing frame would be impossible or impractical. However, it poses many limitations. While screen printing excels at printing over large, flat areas, pad printing is ideal for minute details and curved or irregular surfaces but is neither economical over large areas nor technically possible. It also does not allow for the reproduction of colour images, such as photos or screens, nor provides for 3D or tactile effects. Its field of application is printing decorations, logos, and graphics on consumer products, even with tiny details, such as serial numbers, codes, or subtle textures, which require durable finishes resistant to chemicals or wear. In short, the graphics and their intended use drive a market that continues to see them as a viable alternative when high definition and customisation are required.
21/02/2025


